Winter Sowing
As winter fast approaches, gardeners might assume their green thumbs need to take a seasonal break. However, seasoned gardeners know that winter is the perfect time to prepare for a vibrant spring garden. An effective, lazy gardener approved (me) method gaining popularity over the last few years is winter sowing, a technique created by Trudi Greissle Davidoff. In this guide, we'll explore what winter sowing is and provide you with a step-by-step process, ensuring your garden thrives when the warm weather returns.
What is winter sowing? Many plant seeds, especially those native to our Indiana region, require a period of cold and moist conditions to break dormancy. December through February, gardeners create mini-greenhouses with recycled plastic containers that house, nurture and protect the seeds from the winter conditions, while also providing that needed stratification process. By planting seeds in winter, you're essentially mimicking nature's way, ensuring your seeds receive the treatment they need to germinate robustly. Through this process, plants establish stronger root systems which lead to healthier, more resilient plants. A final added bonus, winter sowing is incredibly cost-effective and sustainable. You use many materials already around your house including recycled materials like milk jugs or plastic containers
Materials Needed
Clear Plastic Container (I use milk jugs)
Scissors
Duct Tape
Potting Soil
Seeds of your choice
Sharpie Marker
Water
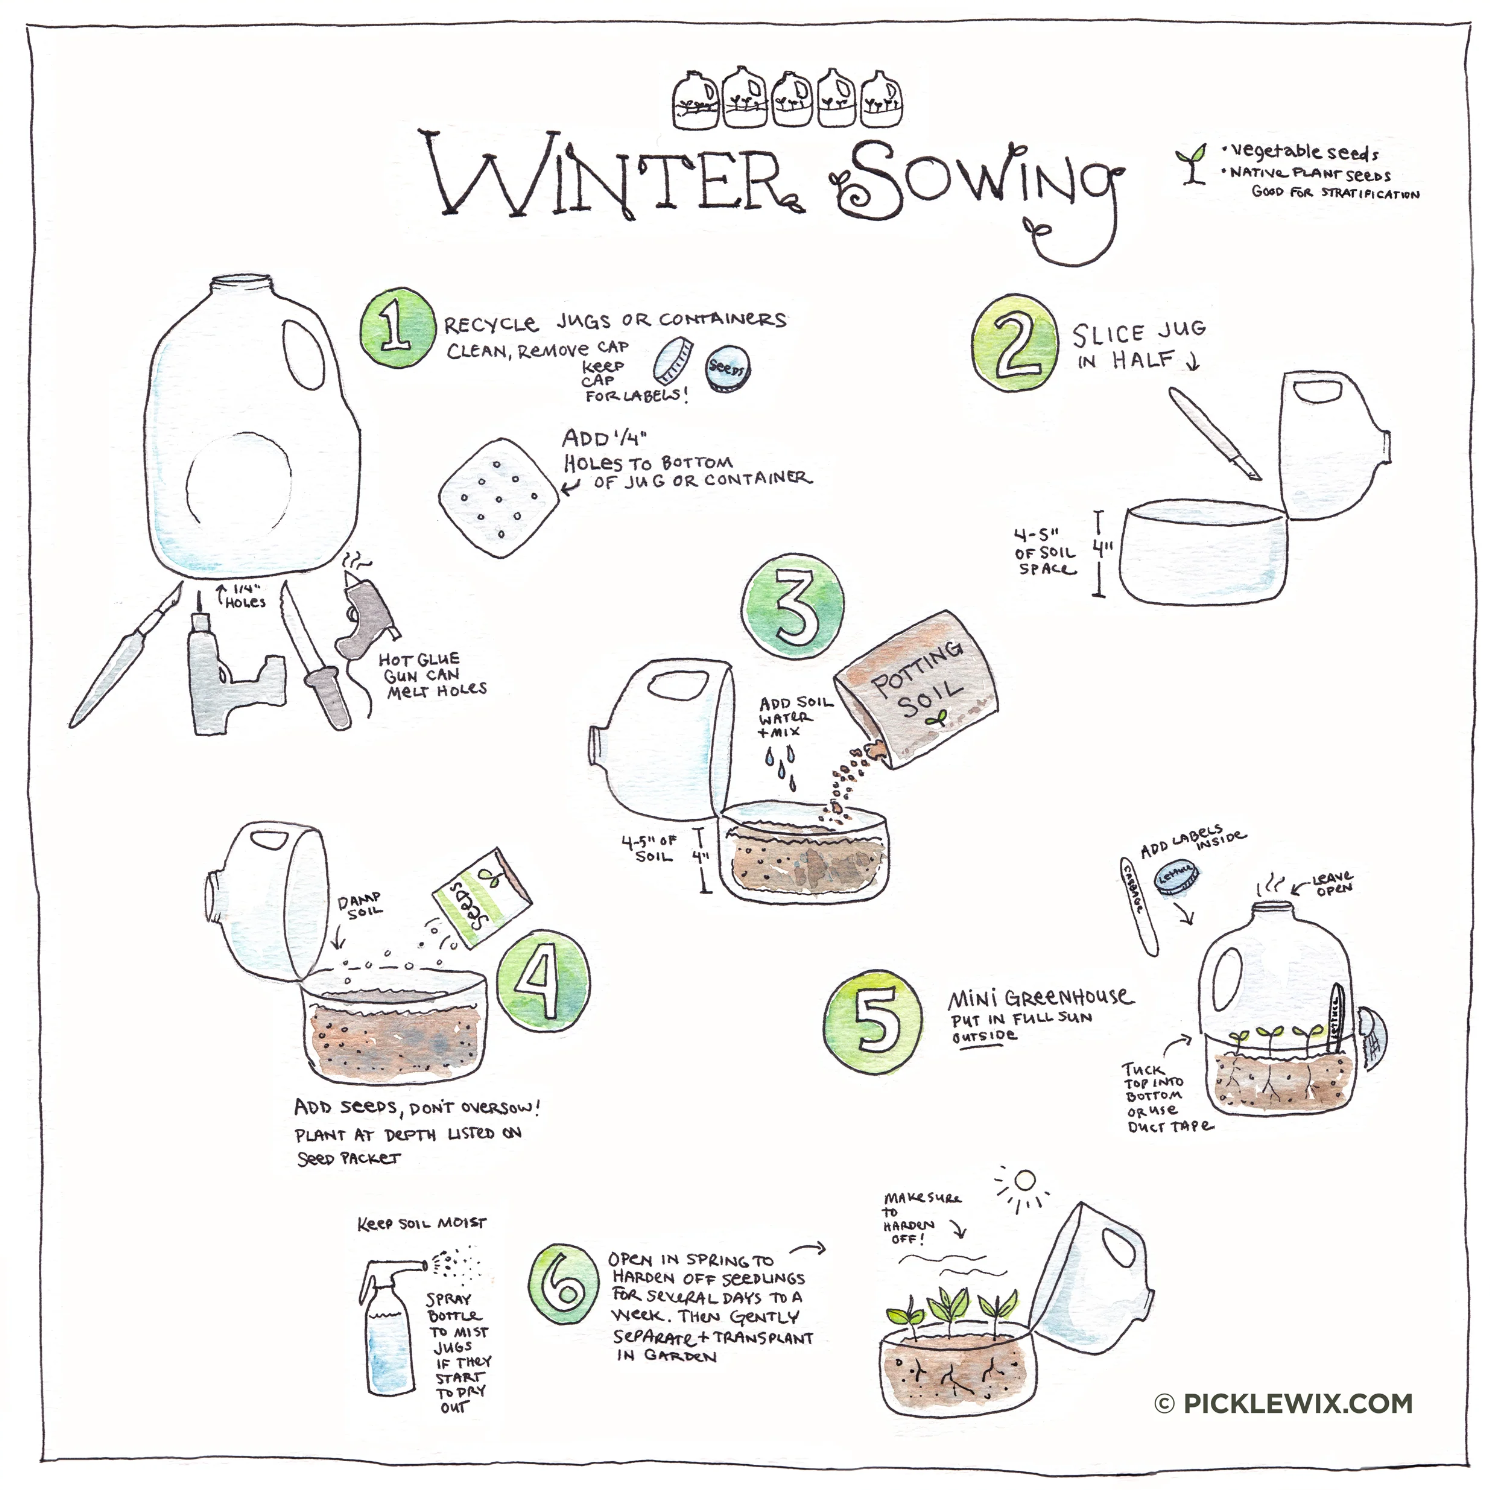
Step-by-Step Instructions (See graphic representation below)
Grab all of your materials listed above. If using jugs, remove the caps.
Cut slits or holes in the bottom of the jug for water to drain throughout the winter. You can use a glue gun to create these holes, if you have one on hand.
Use scissors or a box cutter to slice the container in half. Leave a portion (1”-2”) of the jug uncut to create a hinge. I typically cut so the hinge is where the milk jug handle is located.
Add potting soil to the jug. Potting soil should be at least 3” deep. Add water to the soil.
Plant your seeds in the jug. Sprinkle the seeds evenly. Plant them at the depth noted on the seed packet. Cover with soil, unless the seeds need light to germinate. Refer to your seed packet for more information.
Now it is time to close up the mini-greenhouse. Use the duct tape to attach the top and bottom of the jug together. Ensure it is sealed to contain the moisture inside.
Cut off another piece of duct tape about 4”-5” long. Write the name of the seed on the tape. Place on the bottom of the jug.
Place the jug outside, in full sun where it will receive snow and rain over the winter season.
The snow and rain over the season will water your seeds and seedlings. If the soil becomes dry over a long period of time, put a mister into the jug to water.
Once it starts to warm up in the Spring, remove the duct tape and open up the jugs. Remember, it will be hotter in those jugs than it is outside. They are ready to be transplanted into your yard, once they have their first two true leaves.
Tips:
I have found native plants to work best with this method but try it out and let me know what works best for you! All native plants purchased from Ginger Root are homegrown via Winter Sowing
No plant hardening needed with this process!
Any potting soil mix will work! It is not recommended to use seed starting mix since that soil does not include nutrients and will not sustain the seedlings long term.
Neighbors love to help! Ask in your local buy nothing group for empty, clear milk jugs.
Don't let the winter blues deter you – grab your seeds, gather your materials, and embark on this rewarding gardening adventure. Your future garden will thank you. If not, at least you tried something new! Happy sowing!
Additional Resources:
Winter Sowing Article by Indiana Master Gardener, Beverly Thevenin

